In Linux/Unix systems, sudo is a program that grants a regular user elevated privileges to execute administrator-level tasks. Once a regular user is added to the sudo group, they are able to carry out tasks that a reserve for the root user. Such include installing and removing software packages, starting and stopping services, updating and upgrading the system to mention a few.
In this guide, we will show you how to create a regular user and how to add the user to the sudo group in Debian Linux.
Step 1) Login as the non-root user
To get started, log in to the system as the non-root user on command-line as follows:
$ ssh sysadmin@server-IP-address
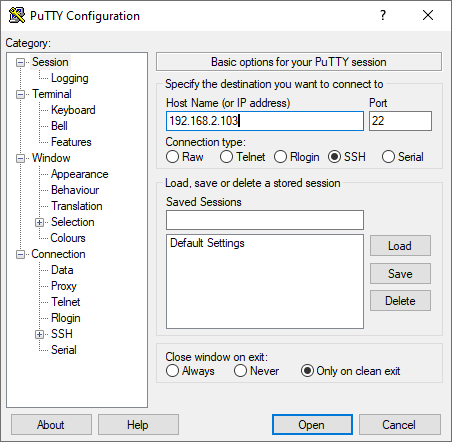
Additionally, you can use an ssh client like Putty or MobaXterm especially if you are working on a windows environment.
For putty, simply provide the IP address and hit ENTER.
Once you logged in, then switch to root user by running following command,
sysadmin@debian:~$ su -
Password:
root@debian:~#
Step 2) Create a new regular user
To create a new user, use the adduser command followed by the username of the new user as shown.
# adduser username
For example, to add a user linuxbuzz, execute the command:
root@debian:~# adduser linuxbuzz
The command creates a new user and assigns a user ID (UID) to the new user. Also, a group is automatically created for the new user along with a group ID (GID) based on the username of the user. Thereafter, a home directory for the new user will be created and several files copied from the /etc/skel directory to the home directory of the user.
To complete the process, provide a strong password for the new user – one that contains a combination of uppercase & lowercase characters, numeric and special characters.
You will also be prompted to specify the user’s information. You can fill in the details or simply hit ENTER to leave the fields blank. Finally, press Y to save the information provided.
At this point, the regular user is created along with the necessary files placed in the user’s home directory.
Step 3) Adding the user to the sudo group
When we do minimal installation of Debian then, sudo package will not installed during the default installation, so first we must install sudo package and then we can add users to sudo group.
To Install sudo, run
# apt install -y sudo
To add the regular user to the sudo group, use the usermod command as shown:
# usermod -aG sudo username
In our case, this will be:
root@debian:~# usermod -aG sudo linuxbuzz
The -a option adds the newly created user to the sudo group without removing it from its default group. Meanwhile the -G option defines the group to which the user will be added. These options should go hand in hand.
Above command can also be executed as:
root@debian:~# usermod -a -G sudo linuxbuzz
You can verify that the user has been added to the sudo group by running the command:
root@debian:~# groups linuxbuzz
linuxbuzz : linuxbuzz sudo
root@debian:~#
From the output, you can see that the user now belongs to two groups: linuxbuzz and sudo.
Step 3) Testing the new user
To switch to the new user, use the syntax:
# su – username
In this case, the command will be:
root@debian:~# su - linuxbuzz
linuxbuzz@debian:~$
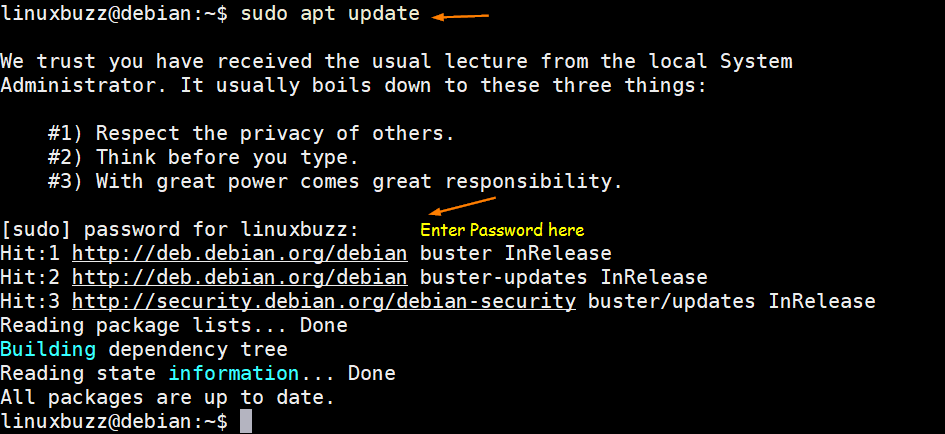
When you invoke sudo for the first time, you will get a brief summary of things to keep in mind. Thereafter, provide the user’s sudo password and hit ENTER.
In the example below, I’m updating the system, so I have to invoke the sudo command.
linuxbuzz@debian:~ sudo apt update
And this brings the tutorial to an end. You have learned how to add a regular use to the sudo group in Debian.
Also Read : How to Disable Reboot using “Ctrl-Alt-Del” on Ubuntu / Debian Server


