In this post, we will cover how to install Putty (ssh client) on Linux and will also show how to use putty to connect to remote servers.
Putty is an open-source terminal emulator, originally developed by Simon Tatham for the Windows platform. It is also accessible on other platforms as well. The Linux version of Putty is a graphical terminal program that enables connecting to serial ports and connecting to distant servers via SSH and telnet clients. This Putty Linux-based can connect to raw sockets as well, usually for debugging purposes.
Putty includes a command-line utility called “psftp,” also known as the PuTTY SFTP client, which lets you securely transfer files between computers over an SSH connection.
Installing Putty on Ubuntu / Linux Mint
Putty package is available in the Ubuntu universe repository, which is fantastic news for Ubuntu users.
Before you attempt to install Putty on Ubuntu, run the following command to make sure the universal repository is enabled.
$ sudo add-apt-repository universe
After you have updated your system repositories, execute the apt install command as shown:
$ sudo apt update
$ sudo apt install putty -y
Installing Putty on SUSE Linux
To install Putty on openSUSE Leap 15.x or Tumbleweed. First, enable the snap daemon and run the common as shown:
$ sudo snap install putty-gtk --edge
Installing Putty RHEL/ CentOS / Fedora / Rocky and AlmaLinux
You can use Yum or dnf, the default package managers for these distributions, for installing Putty.
$ sudo yum install putty
OR
$ sudo dnf install putty
Installing Putty on Debian
Putty is accessible for Debian and all of its distros via the apt or apt-get package manager.
$ sudo apt install putty
OR
$ sudo apt-get install putty
Installing Putty on Arch Linux
The Putty package comes preinstalled in Arch Linux repositories. To Install Putty, execute the subsequent Pacman command as shown:
$ sudo pacman -S putty
Installing Putty from Linux source Code
If you want to construct the SSH client from scratch on your own and get your hands “dirty,” you’re in luck because Putty is open-source and you can grab the source code by using the wget command below to download it from the Putty website.
$ wget https://the.earth.li/~sgtatham/putty/latest/putty-0.79.tar.gz
$ tar -xvf putty-0.79.tar.gz
$ cd putty-0.79/
$ ./configure
$ sudo make install
All right, everyone! Having learned how to install Putty, you can now do it on any Linux distribution and in any situation. Let us now look at how Putty can be used to connect to distant servers.
How to Connect Remote Linux Server Using PuTTY
For this demo, I’m using an Ubuntu 22.04 LTS desktop. To get started, run the following commands to make sure you have OpenSSH-server running in the background.
$ sudo apt install openssh-server -y
$ sudo systemctl enable ssh
Next, we’ll launch Putty from the application menu.

Enter the remote server’s IP address and SSH port in the following window and click Open.

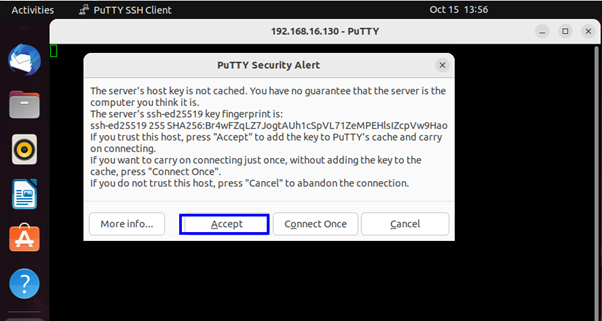
In this window, click the Accept button in order to allow the exchange of keys.

You will then be prompted to enter your user password.

Now the display below shows that our connection to our Linux server was successful.

Perfect, above confirms that we have successfully connected to our Linux server.
How to Access Public Cloud Linux Server Using Putty
Let’s assume we have a Linux server in AWS cloud, so to connect to a public cloud server we must have ssh keys. Putty accept only ‘. ppk’ extension for ssh keys. In case you have ‘.pem’ format key file then convert it to ppk format using puttyegn tool.
When we install putty then puttygen gets installed automatically. To convert ‘.pem’ to ‘.ppk’ format , run
$ puttygen pkumar-keys.pem -o pkumar-keys.ppk
Once you have the keys, start the putty enter the IP address of your public cloud Linux server and specify the location of your ssh keys file (SSH –> Auth)
Now Go to ‘SSH’ Tab and the click on ‘Auth’ and browse the ssh keys file
Click on Open to connect to your public cloud Linux Server,
Great, above screen confirms that we have successfully able to ssh to access our Ubuntu Linux server hosted in AWS public cloud.
Conclusion
Try Putty if you like; it comes with amazing features and benefits. In addition to managing sessions, Putty has a number of fantastic customization options that let you access serial ports, track down issues, and more
Also Read : How to Edit PDF Files in Linux Desktop


Can you guide using Terminal?